NOTE: If you create and enable API keys for your site and use Telegraf to send server stats to the portal from the same server, you must add your API key to your telegraf configuration.
Create a New API Key on the ProTop Portal
1. Log in as a user with an admin or super admin role.
2. Navigate to Users Administration and click the button to Manage API Keys: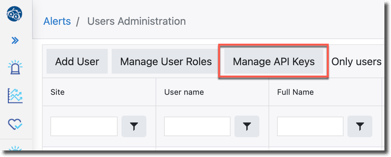
3. Click the Create New Key button:
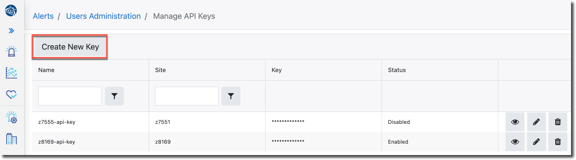
The Create New Key form appears: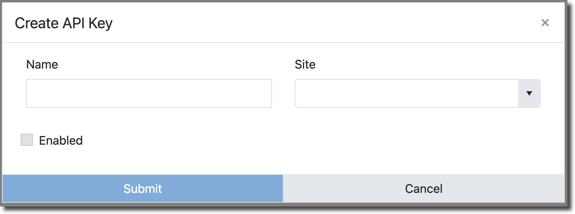
4. Give your new API key a name. The name is arbitrary. It just needs to be unique and meaningful to you.
5. Select the Site this key applies to from the dropdown.
6. Click the Enabled checkbox.
7. Click the Submit button.
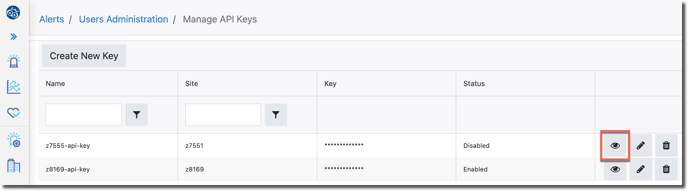
You have now defined and enabled a new API Key for the selected site. The new key will appear in the Manage API Keys list.
Let's copy the new API Key while we are in here. We'll use it later. Click the eye (view) icon:
 The key will be revealed. Use the copy button to copy the key to the clipboard:
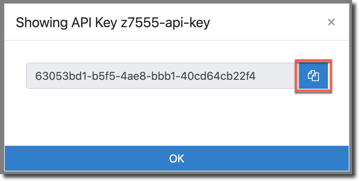
Enforce the API Key at the resource level
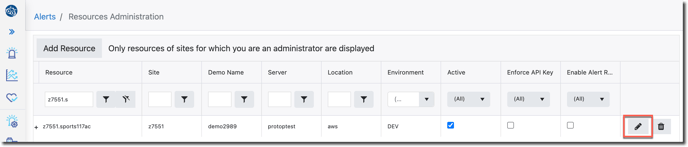
1. Navigate to Resources Administration and click the pencil (edit) icon for the resource you want this API Key enforced for:
2. Click the Enforce API Key checkbox
3. Click the diskette (save) icon:

The new API Key will now be enforced for this resource.
NOTE: All new incoming data that arrives at the ProTop Portal for this resource must be accompanied by the now-enforced API Key, or that data will be ignored.
How to send the API Key to the Portal with your ProTop data
1. Log on to the server that contains the resource you selected to enforce the API Key for.
2. Change directory to your ProTop etc directory
3. Copy ak.cfg to ak.[site].cfg
4. Edit ak.[site].cfg
5. Change this line:
demo.wss.com|*||||X-API-KEY|DEFAULT
6. Replace demo.wss.com with the ProTop Portal you are sending your data to, for instance, dashboard.wss.com.
7. Paste your key, copied above, over the word DEFAULT at the end of the line above. The result should look something like this:
dashboard.wss.com|*||||X-API-KEY|63053bd1-b5f5-4ae8-bbb1-40cd64cb22f4
This key will now be sent in the header along with your ProTop data to any REST API on dashboard.wss.com.
NOTE: If the ProTop Portal has not been completely configured and active at the site and resource levels, the header key information will be ignored, and the data will be accepted and stored.
Need more precise API Key restrictions?
The $PROTOP/etc/ak.[site].cfg can be configured in a variety of ways to address different levels of control over your API Keys:
# field 1 is the host list, the host list supports MATCHES style wild cards
# field 2 is the api list, the api list supports MATCHES style wild cards
# field 3 is the "effective" (starting) timestamp (DTZ), if empty it is effective immediately, i.e. 2023-10-24T10:20:57.086-04:00
# field 4 is the "expires" timestamp (DTZ), if empty there is no expiration
# field 5 is the version of api key logic
# field 6 is the header to insert (version 0)
# field 7 is the value of the api key (version 0)
Need Multiple Concurrent API Keys?
You can do that! Will you roll out changes and/or updates or just routinely rotate keys over a large number of resources? Do you suspect a key is compromised? That might involve updating multiple servers and, thus, multiple config file updates over an extended period of time. ProTop has you covered by allowing you to have more than one API Key active concurrently.
For example, if you suspect a compromised key or a key is expiring soon, and you need to replace it on multiple servers, create a second key and transition your servers to use the new key one by one. When you have transitioned all of your servers you can delete the compromised/expiring key. No data is lost in the process.