NOTE: There are two sets of alert data when filtering
When you first log onto the ProTop Portal, you see your Alerts feed in the window on the right. These alerts are from all of your sites and resources over the past 24 hours.
To see alerts created before the last twenty-four hours, filter on a site by clicking the site name link in the Resources window on the left. Or click on a resource line (not the resource link).
Once you have filtered on a site or resource, you will be filtering on your entire alert history.
The omnisearch bar:
A brief introduction:
Click "Filter data ...", also known as the "Omnisearch bar," and you will be presented with options to begin filtering the data shown in the Resources and Alerts windows.
An overview of filtering using omnisearch and setting a default:
Constructing a compound filter following the omnisearch prompts:
A Step-by-Step Guide to Constructing a Filter
1. Click into the Filter Data ... field to start:
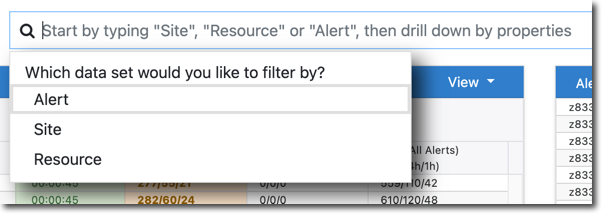
You can filter on these entities today with any combination of and/or logic:
- alert - see the contents of an alert message
- site - see all the resources of a specific site
- resource - see the alerts for a given resource
As you type in the Omnisearch Bar, the dropdown list is dynamically filtered to show only those values beginning with the letter(s) you type. Once you see the value you want in the drop-down list, click on it to populate the Omnisearch Bar.
2. Type the letter "s" and the dropdown list will be filtered to "site."
3. Click the "site" line in the dropdown, and "site" will be populated in the Omnisearch bar.
You can also use the up and down arrows to highlight and select an option in the list.
Once you have selected an entity from the dropdown, the Omnisearch bar will add a period and present a new dropdown list of the entity's properties you can filter by:
Here are the Alert Properties:
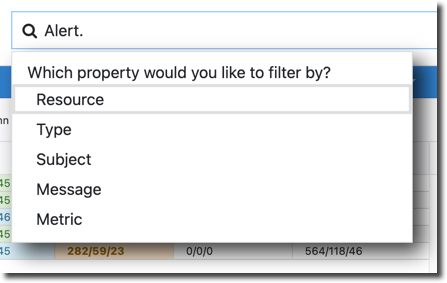
| Property | Description |
| Resource | site name "." resource name e.g. z8331.mb117sports, found in Admin > Resources |
| Type | info, alert, alarm, page or code, these options appear when you select "type" from the alert properties list |
| Subject | alert subject, the right-most column in the alerts window |
| Message | alert message, the details that pop up when you hover over or right-click on a Subject and select Alert Details |
| Metric | the name of an alertable metric contained in the Subject or Message |
Resource Properties:
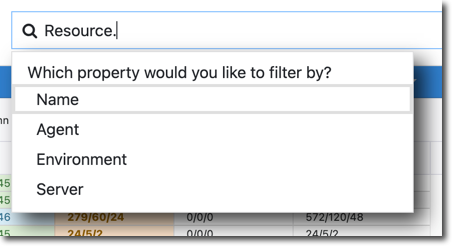
| Property | Description |
| Name | e.g. z8331.mb117sports |
| Agent | found in Resource Administration |
| Environment | i.e. dev, prod etc, values found in Resource Administration |
| Server | Name of the Server the Resource is running on |
And Site Properties:
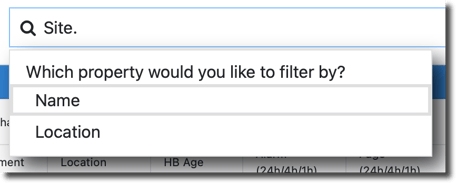
| Property | Description |
| Name | the site name found in etc/custid.cfg e.g. z8331 |
| Type | free, enterprise, consulting... found in Site Administration |
4. For our example, select "Name" in the dropdown. The property will be added to the filter string.
Next, you will be presented with a dropdown of conditional operators appropriate for the data type of the property you chose.
In our example, Name is a string that allows for equal (=), not equal (!=), and matches. Matches is a string found within a string and formed with asterisks i.e., *string*.
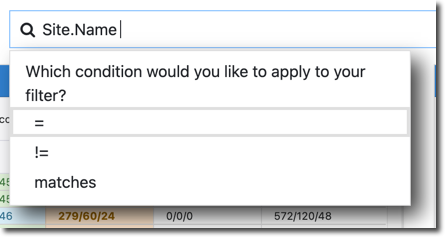
5. Select the operator you are interested in ("=" in this case) by clicking it or using the up and down arrows and pressing enter to select it.
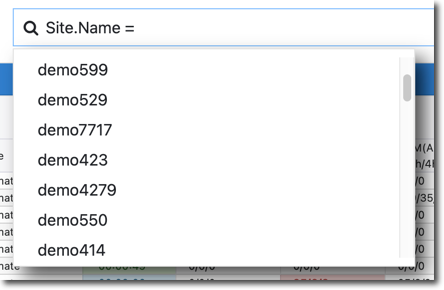
The operator will be added to your query, and if you choose "=" (not != or matches), you will then be presented with a list of values you can select for that operator. In this case, a list of site names:
A note on 'matches'
If you select matches as your operator, surround the exact text (it is case-sensitive) you want to match with asterisks. e.g. alert.subject matches *otrx*.
BONUS: Matches returns all alerts that contain the string anywhere in the alert subject or message body.
6. Start typing the name of the site you are interested in. The list will narrow to those which begin with the letters you type.
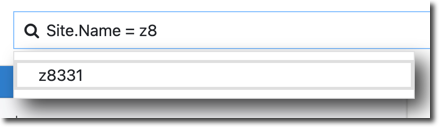
7. Once you see the item you are interested in, click or use the arrow keys and the enter key to select. Now you have a fully formed query. You will be prompted to "Press enter or optionally add another filter."
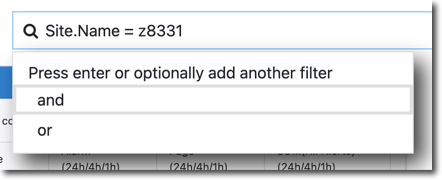
8. At this point, you can simply hit the enter key to execute your current query.
If you want to add another filter, select and/or from the list and repeat the steps above to build the next portion of your query.
NOTE: Use ESC or click the X at the far right of the omnisearch bar to reset and start a new filter.
9. Save As - Once you have created a filter you wish to keep, you can save it by clicking the "Save As" button.

This dialog will pop up:
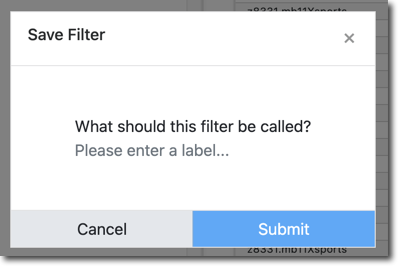
10. Click on the grey text beginning "Please ...", type in a name, and click the submit button.
11. Later, you can re-run your saved filter. Simply click the Saved Filters button:

12. Click the filter you are interested in, and
13. Click the Apply Filter button:
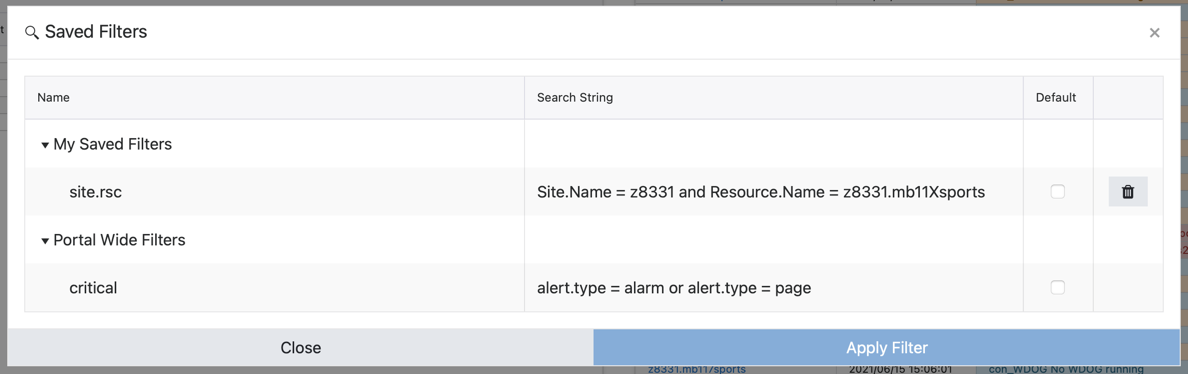
14. Click the check box in the Default column and click Close to apply that filter whenever you arrive on the Alerts Dashboard. This, in effect, replaces the predefined critical resource and alert windows folks might be accustomed to in the current portal with a fully customizable filter of your choosing.